Build and publish your own NPM package
This guide will go through setting up a Typescript project to be published as an NPM package to npmjs.com.
Setting up the project
-
To setup the NPM project run:
npm initAnd answer the questions asked. It is not important to set everything correctly right now, as we can always change it later.
-
Install Typescript (at the time of writing version 5.1.6) and Rollup (3.27.0)
npm i -D typescript rollup rollup-plugin-typescript2rollupis used to create and optimize the bundle we will publish androllup-plugin-typescript2is used to instruct rollup how to handle typescript files. -
Initialize typescript project
npx tsc --initThis will generate the
tsconfig.jsonfile. -
Make sure that these settings are set in the
tsconfig.json{ "module": "ES2022", // rollup cannot handle 'commonjs' - you can use 'ES2015', 'ES2020', 'ES2022' or 'ESNext' "moduleResolution": "Node" // otherwise you can't use module imports like "import axios from 'axios'" "declaration": true, // to make sure the types (d.ts files) are emitted to dist folder as well "declarationMap": true, // to create sourcemaps for d.ts files "noEmit": true // rollup will emit the code no need here } -
Create a
rollup.config.mjsfile with the following contents. See full configuration options hereimport typescript from 'rollup-plugin-typescript2' export default { input: 'index.ts', // this is the entrypoint relative to project root. This option is not affected by tsconfig settings output: [ { file: "dist/index.js", format: 'cjs', exports: 'named', sourcemap: true, strict: true } ], // add the typescript plugin to let rollup know how to handle typescript files plugins: [typescript()], // if the application has any peer dependencies which are not bundled in the package, you can specify them here external: [] } -
Add the following scripts to the
package.json. The start script will run a watch which will trigger a build when any file changes any. The build script runs a single build, this would be used in your CI/CD pipeline.{ ... "scripts": { "start": "rollup -c -w", "build": "rollup -c" } ... } -
Create the
index.tsfile in the root of the project. This is the entrypoint to the package no matter if the package is a CLI tool or a React component library. For now you can just add the following:console.log('hello world') -
Last create a
.npmignorefile in the root of the project. And add the following contentrollup.config.mjs tsconfig.json index.tsThis will make sure that redundant files are not included in the bundle published to npmjs.org
-
This is the minimal setup for the project itself keep reading to configure continuous deployment. To start developing run
npm startYou should get the following output:

Additional dependencies
Usually you will need a few more dependencies for building your package. Be careful not to add dependencies using the normal npm install command as this would mean that these dependencies would be bundled along with your package and increase the size and in worst case cause conflicts for users of the package.
Instead add the packages as development dependencies using
npm install --save-dev some-package
# or
npm i -D some-package
And then add the package to the peerDependencies object in your package json like this
{
   "peerDependencies": {
    "axios": "^1.4.0"
  },
  "devDependencies": {
    "axios": "^1.4.0"
  }
}
as well as in the rollup.config.mjs
export default {
    // ...
    external: ["axios"]
}
If you forget, you will also get a warning when rollup is running 
Test the package
To verify that the bundle is working properly you should always test the project first. There are several ways to do this, I recommend using both of these methods:
Using test project
You can create a new project and use the npm link command to add your local package as a dependency
# in dist folder run
npm link
# in test project root run
npm link my-package --save
my-package is the name specified in the package.json of your package project. The result should be a new line in your dependencies section in your package.json which looks something like this:
{
    "my-package": "file:../my-package"
}
Now you can use the packages or commands from the package.
Using dry-run
Run the command
npm publish --dry-run
This will show you all the files that will be published. This script is very good for finding files you don't want to publish. Files that are irrelevant to the bundle should be added to a .npmignore file, which follows the same rules as the .gitignore file.
Read more about the .npmignore file here
Configure workflow
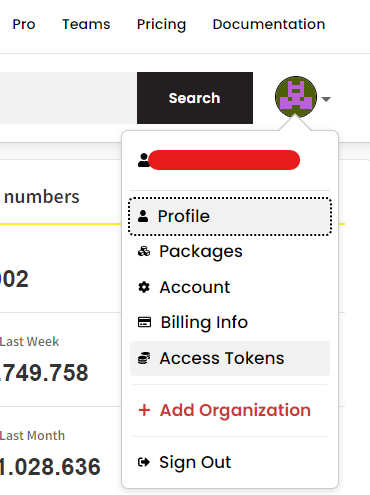
- In npmjs.org go to
Access Tokens

- Create a
classicaccess token of typeAutomation- or a
granularaccess token with theread and writepermission onPackages and scopes
- Copy the token and save it as a repo secret in Github with the name
NPM_TOKEN. Create.github/workflows/publish.yamlwith the following content
name: Publish Package to npmjs
on:
  release:
    types: [published]
jobs:
  build:
    runs-on: ubuntu-latest
    steps:
      - uses: actions/checkout@v3
      # Setup .npmrc file to publish to npm
      - uses: actions/setup-node@v3
        with:
          node-version: '16.x'
          registry-url: 'https://registry.npmjs.org'
      # install dependencies
      - run: npm ci
      # build the project
      - run: npm run build
      # publish the package to npmjs.org
      - run: npm publish --access public
        env:
          NODE_AUTH_TOKEN: $
After you push the code you can create a new release. (You find the releases in the code tab of your repository then navigate to tags where you can create releases) When the release has been created and published, the workflow will start and publish the package to npmjs.org. Remember to update the version in your package.json before you create a new release.
Problems
If building CLI tools
If you are building a CLI tool and have added #!/usr/bin/env node at the top of your index.ts and the script still doesn't work. You can try the following:
- Install
rollup-plugin-preserve-shebangsnpm i -D rollup-plugin-preserve-shebangs - Update the
rollup.config.mjsfile:import { preserveShebangs } from 'rollup-plugin-preserve-shebangs'; export default { // ... plugins: [ // ... preserveShebangs() ], } - Now the generated output should include
#!/usr/bin/env node.